The InsertControlItem property creates the specified ActiveX control and hosts to a new child item of the control, while the InsertObjectItem property hosts the already created object to a new child item of the control. An inner control sends notifications/events to parent control through the ItemOleEvent event. Use the AddBar method to add bars to the item. The bars are always shown in the chart area. Use the PaneWidth property to specify the width of the chart.
The ControlID must be formatted in one of the following ways:- A ProgID such as "Exontrol.G2antt"
- A CLSID such as "{8E27C92B-1264-101C-8A2F-040224009C02}"
- A URL such as "https://www.exontrol.com"
- A reference to an Active document such as "c:\temp\myfile.doc", or "c:\temp\picture.gif"
- A fragment of HTML such as "MSHTML:<HTML><BODY>This is a line of text</BODY></HTML>"
- A fragment of XML
In case the control you want to insert fails, you can add the "A2X:" prefix to the ControlID such as:
- A ProgID such as "A2X:Exontrol.Grid"
- A CLSID such as "A2X:{8E27C92B-1264-101C-8A2F-040224009C02}"
- A URL such as "A2X:https://www.exontrol.com"
- A reference to an Active document such as "A2X:c:\temp\myfile.doc", or "c:\temp\picture.gif"
- A fragment of HTML such as "A2X:MSHTML:<HTML><BODY>This is a line of text</BODY></HTML>"
The InsertControlItem property creates an ActiveX control that's hosted by the exGrid control. The look and feel of the inner ActiveX control depends on the identifier you are using, and the version of the library that implements the ActiveX control, so you need to consult the documentation of the inner ActiveX control you are inserting inside the exG2antt control.
Use the ItemHeight property to specify the height of the item when it contains an ActiveX control. Use the ItemWidth property to specify the width of the ActiveX control, or the position in the item where the ActiveX is displayed. Once that an item of ActiveX type has been added you can get the OLE control created using the ItemObject property. To check if an item contains an ActiveX control you can use ItemControlID property. To change the height of an ActiveX item you have to use ItemHeight property. When the control contains at least an item of ActiveX type, it is recommended to set ScrollBySingleLine property of control to true. Events from contained components are fired through to your program using the exact same model used in VB6 for components added at run time ( See ItemOleEvent event, OleEvent and OleEventParam ). For instance, when an ActiveX control fires an event, the control forwards that event to your container using ItemOleEvent event of the exG2antt control. Use the BeginUpdate and EndUpdate methods to update the control's content when adding ActiveX controls on the fly. Use the ItemControlID property to retrieve the control's identifier.

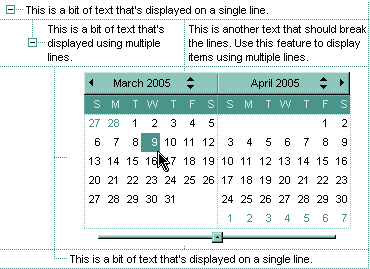
The following VB sample adds the Exontrol's ExCalendar Component:
With G2antt1
    .BeginUpdate
    .ScrollBySingleLine = True
    With G2antt1.Items
        Dim h As HITEM
        h = .InsertControlItem(, "Exontrol.Calendar")
        .ItemHeight(h) = 182
        With .ItemObject(h)
            .Appearance = 0
            .BackColor = vbWhite
            .ForeColor = vbBlack
            .ShowTodayButton = False
        End With
    End With
    .EndUpdate
End With
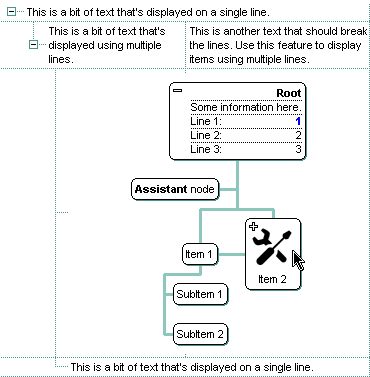
The following C++ sample adds the Exontrol's ExOrgChart Component:
#include "Items.h"

#pragma warning( disable : 4146 )
#import <ExOrgChart.dll>

CItems items = m_g2antt.GetItems();
m_g2antt.BeginUpdate();
m_g2antt.SetScrollBySingleLine( TRUE );
COleVariant vtMissing; V_VT( &vtMissing ) = VT_ERROR;
long h = items.InsertControlItem( 0, "Exontrol.ChartView", vtMissing );
items.SetItemHeight( h, 182 );
EXORGCHARTLib::IChartViewPtr spChart( items.GetItemObject(h) );
if ( spChart != NULL )
{
	spChart->BeginUpdate();
	spChart->BackColor = RGB(255,255,255);
	spChart->ForeColor = RGB(0,0,0);
	EXORGCHARTLib::INodesPtr spNodes = spChart->Nodes;
	spNodes->Add( "Child 1", "Root", "1", vtMissing, vtMissing );
	spNodes->Add( "SubChild 1", "1", vtMissing, vtMissing, vtMissing );
	spNodes->Add( "SubChild 2", "1", vtMissing, vtMissing, vtMissing );
	spNodes->Add( "Child 2", "Root", vtMissing, vtMissing, vtMissing );
	spChart->EndUpdate();
}
m_g2antt.EndUpdate();
The sample uses the #import statement to include the ExOrgChart's Type Library. In this sample, the ItemObject property retrieves an IChartView object. The path to the library should be provided in case it is not located in your system folder.
The following C# sample adds the Exontrol's ExG2antt Component:
axG2antt1.BeginUpdate();
EXG2ANTTLib.Items items = axG2antt1.Items;
axG2antt1.ScrollBySingleLine = true;
int h = items.InsertControlItem(0, "Exontrol.G2antt","");
items.set_ItemHeight(h, 182);
object g2anttInside = items.get_ItemObject(h);
if ( g2anttInside != null )
{
	EXG2ANTTLib.G2antt g2antt = g2anttInside as EXG2ANTTLib.G2antt;
	if (g2antt != null)
	{
		g2antt.BeginUpdate();
		g2antt.LinesAtRoot = EXG2ANTTLib.LinesAtRootEnum.exLinesAtRoot;
		g2antt.Columns.Add("Column 1");
		g2antt.Columns.Add("Column 2");
		g2antt.Columns.Add("Column 3");
		EXG2ANTTLib.Items itemsInside = g2antt.Items;
		int hInside = itemsInside.AddItem("Item 1");
		itemsInside.set_CellValue(hInside, 1, "SubItem 1");
		itemsInside.set_CellValue(hInside, 2, "SubItem 2");
		hInside = itemsInside.InsertItem(hInside, null, "Item 2");
		itemsInside.set_CellValue(hInside, 1, "SubItem 1");
		itemsInside.set_CellValue(hInside, 2, "SubItem 2");
		g2antt.EndUpdate();
	}
}
axG2antt1.EndUpdate();
The following VB.NET sample adds the Exontrol's ExOrgChart Component:
With AxG2antt1
    .BeginUpdate()
    .ScrollBySingleLine = True
    With .Items
        Dim hItem As Integer
        hItem = .InsertControlItem(, "Exontrol.ChartView")
        .ItemHeight(hItem) = 182
        With .ItemObject(hItem)
            .BackColor = ToUInt32(Color.White)
            .ForeColor = ToUInt32(Color.Black)
            With .Nodes
                .Add("Child 1", , "1")
                .Add("SubChild 1", "1")
                .Add("SubChild 2", "1")
                .Add("Child 2")
            End With
        End With
    End With
    .EndUpdate()
End With
The following VFP sample adds the Exontrol's ExGrid Component:
with thisform.G2antt1
	.BeginUpdate()
	.ScrollBySingleLine = .t.
	with .Items
		.DefaultItem = .InsertControlItem(0, "Exontrol.Grid")
		.ItemHeight( 0 ) = 182
		with .ItemObject( 0 )
			.BeginUpdate()
			with .Columns
				with .Add("Column 1").Editor()
					.EditType = 1 && EditType editor
				endwith
			endwith
			with .Items
				.AddItem("Text 1")
				.AddItem("Text 2")
				.AddItem("Text 3")
			endwith
			.EndUpdate()
		endwith
	endwith
	.EndUpdate()
endwith
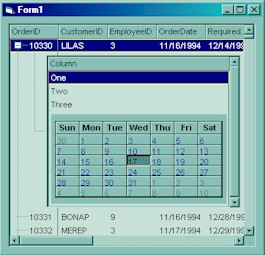
The following VB sample adds dynamically an ExG2antt ActiveX Control and a Microsoft Calendar Control:
' Inserts a new ActiveX control of Exontrol.G2antt type
Dim hG2antt As HITEM
hG2antt = G2antt1.Items.InsertControlItem(G2antt1.Items(0), "Exontrol.G2antt", runtimelicensekey )
' Sets the ActiveX control height
G2antt1.Items.ItemHeight(hG2antt) = 212
' Gets the ExG2antt control created. Since the ProgID used to create the item is "Exontrol.G2antt"
' the object will be of EXG2ANTTLibCtl.G2antt type
Dim objG2antt As Object
Set objG2antt = G2antt1.Items.ItemObject(hG2antt)
objG2antt.Columns.Add "Column"
objG2antt.Items.AddItem "One"
objG2antt.Items.AddItem "Two"
objG2antt.Items.AddItem "Three"

' Inserts a new ActiveX control of MSCAL.Calendar type
Dim hCalc As HITEM
hCalc = objG2antt.Items.InsertControlItem(, "MSCal.Calendar")
Set objCalc = G2antt1.Items.ItemObject(hCalc)
objCalc.ShowTitle = False
objCalc.ShowDateSelectors = False
where the runtimelicensekey is the exG2antt's runtime license key. Please contact us to get the exG2antt's runtime license key. Please notice that your development license key is not equivalent with the generated runtime license key. Your order number is required, when requesting the control's runtime license key. If you are using the DEMO version for testing purpose, you don't need a runtime license key.
The following VB sample handles any event that a contained ActiveX fires:
Private Sub G2antt1_ItemOleEvent(ByVal Item As EXG2ANTTLibCtl.HITEM, ByVal Ev As EXG2ANTTLibCtl.IOleEvent)
    On Error Resume Next
    Dim i As Long
    Debug.Print "The " & Ev.Name & " was fired. "
    If Not (Ev.CountParam = 0) Then
        Debug.Print "The event has the following parameters: "
        For i = 0 To Ev.CountParam - 1
            Debug.Print " - " & Ev(i).Name & " = " & Ev(i).Value
        Next
    End If
End Sub
Some of ActiveX controls requires additional window styles to be added to the conatiner window. For instance, the Web Brower added by the G2antt1.Items.InsertControlItem(, "https://www.exontrol.com") won't add scroll bars, so you have to do the following:
First thing is to declare the WS_HSCROLL and WS_VSCROLL constants at the top of your module:
Private Const WS_VSCROLL = &H200000
Private Const WS_HSCROLL = &H100000
Then you need to to insert a Web control use the following lines:
Dim hWeb As HITEM
hWeb = G2antt1.Items.InsertControlItem(, "https://www.exontrol.com")
G2antt1.Items.ItemHeight(hWeb) = 196
Next step is adding the AddItem event handler:
Private Sub G2antt1_AddItem(ByVal Item As EXG2ANTTLibCtl.HITEM)
    If (G2antt1.Items.ItemControlID(Item) = "https://www.exontrol.com") Then
        ' Some of controls like the WEB control, requires some additional window styles ( like WS_HSCROLL and WS_VSCROLL window styles )
        ' for the window that host that WEB control, to allow scrolling the web page
        G2antt1.Items.ItemWindowHostCreateStyle(Item) = G2antt1.Items.ItemWindowHostCreateStyle(Item) + WS_HSCROLL + WS_VSCROLL
    End If
End Sub
If somehow the InsertItemControl wasn't able to create your ActiveX on some Windows platforms, and you don't know why, you can use the following
code to make sure that ActiveX control can be created properly by using ( the sample is trying to add a new Microsoft RichText ActivX control into your form):
Controls.Add "RICHTEXT.RichtextCtrl", "rich"


